A development platform for all kinds of makers
May 12, 2015

The number and variety of DIY boards available today is quite amazing. There's a board for every level of maker from beginner students to advanced pro...
The number and variety of DIY boards available today is quite amazing. There’s a board for every level of maker from beginner students to advanced professionals, but no matter the level they all seem to have a steep learning curve to get to your first blinking LED. For those new to electronics and programming this perceived barrier to entry can be a deterrent to getting started. Jason Gouw, electrical engineer, lifelong maker, and Co-founder of Qfusion Labs, saw an opportunity to bridge this gap and make DIY electronics more accessible.
The current method
The barrier to entry for new makers may in part be due to the bottom-up approach often used for starting in electronics and programming.
“An analogy I like to use is when we first learn to drive a car we’re not taught what the brake pedal is, what the engine does, and what the transmission does,” Gouw says. “We’re taught this is how a car goes on the road, and to stop it use the brake, to make it go use the gas pedal. That’s a top-down approach to learning how to drive a car. But right now in schools and in electronic and software educational classes people are still being taught from the bottom up.”
The level of knowledge needed for tools to make the ideas in their heads can also hinder would-be makers from getting started.
“I think people are limited by the available tools at hand – that’s what’s keeping them from building and innovating more than they do,” Gouw says.
One example of what happens when tools become more accessible to non-experts is 3D printing. Fused deposition modeling technology hasn’t changed dramatically in the last couple decades besides in price, Gouw says, but in the last few years the software that makers use to interact with the technology has become much simpler.
“Now there is better software to allow people to easily model something in a CAD program and just port it right to the 3D printer, whereas before you’d have to be able to do that in a traditional AutoCAD that exports Gcode and you’d have to transfer that to the machine,” Gouw says.
And though maker communities are very helpful and have a plethora of information, that information is not always accessible for beginners.
“There is a vast amount of information out there on the Internet and forums where people can just download, for example, stepper motor driver libraries and they can experiment with them so they get a stepper motor to work the way they want, but they often don’t fully understand how it really works,” Gouw says. “This is ok, but if they want to make a change in the code it becomes very difficult because they have the stepper motor library that’s several pages long and they’re unsure of which value to change.”
The inspiration
As an engineer for ferryboat services, Gouw often used industrial automation programmable logic controllers (PLCs) on the job.
“PLCs are a very modular system so it’s very easy to add on modular blocks for controlling motors, lights, whatever, and programming them uses ladder logic, which is a fairly easy way to create programs other than coding,” Gouw says. “I took that concept and thought why don’t we have this for a consumer that’s a little bit more cost-effective and friendly to use?”
With this approach in mind, Gouw, along with his software engineer brother Marvin Gouw and some friends, built the Cubit Controller and Workshop visual programming tool.
The platform
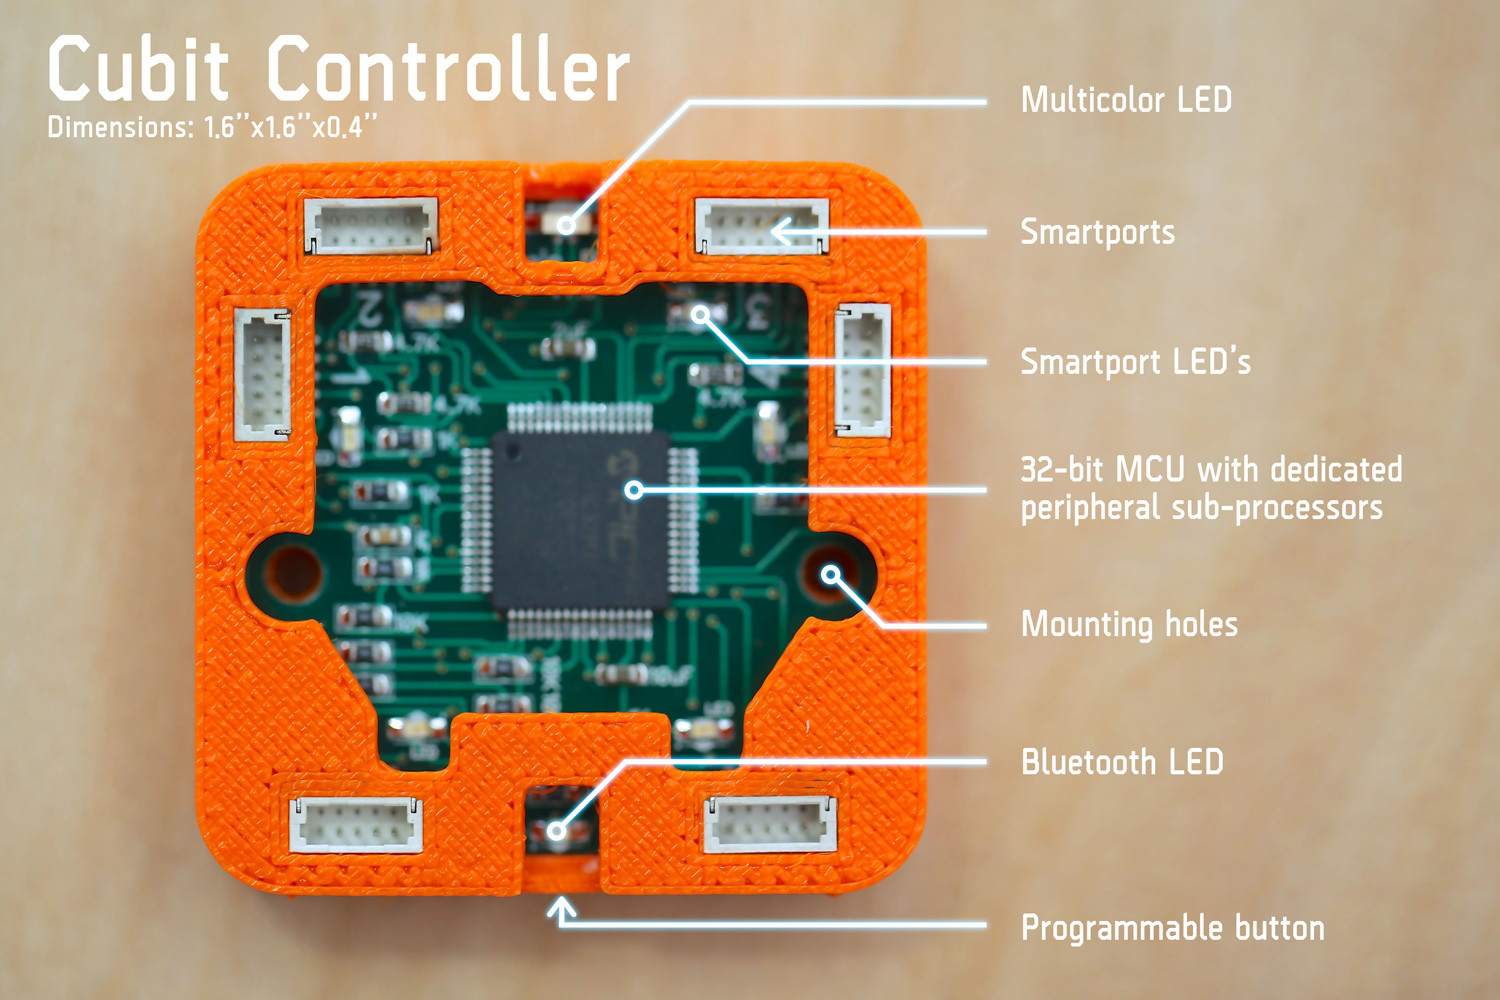
The 1.6″ x 1.6″ x 0.4″ Cubit Controller hardware consists of a 32-bit MCU, built-in Bluetooth, a multicolor LED, a programmable button, and six Smartports which all can be used to power Cubit and to connect Smartware add-on modules. The Smartwares – the 20 of which so far cover the basics like servos, sensors, buttons, LEDs, and a custom connector – have embedded chips that do all of the handshaking in the background so users don’t have to know how to wire or configure the electronic components. Through Bluetooth the Cubit Controller wirelessly pairs with a computer for programming through Workshop and loading the program back to the Cubit Controller. Bluetooth was chosen for the first iteration over Wi-Fi for the sake of battery life, the ability to still be able to program the device while it’s inaccessible inside a project, and for having wireless communication capabilities out of the box so multiple Cubit Controllers can talk to each other and work together.
|
|
In Workshop, makers can drag and drop program blocks and connect the “wires” in their project diagram. Behind the scenes, clicking launch causes Workshop to convert the visual blocks into the Lua open source scripting language and loads the code onto Cubit’s MCU. Visually programming in workshop gives makers more flexibility on how they structure the visual code blocks – they’re not limited by the rigid structure of traditional code.
|
|
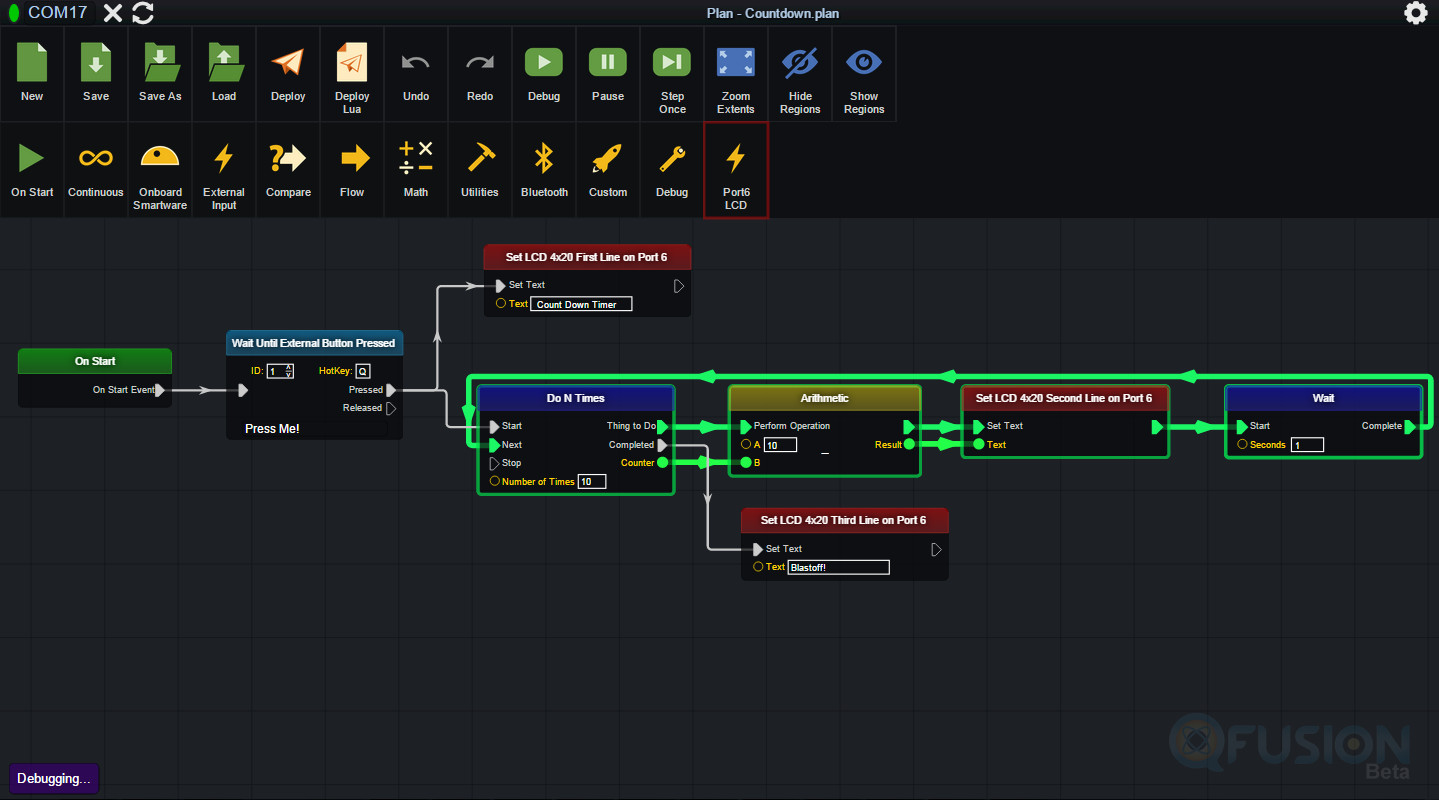
“One of the biggest differentiating factors between Cubit and existing platforms on the market now is the ability to run multiple program loops simultaneously within Workshop,” Gouw says. “You can have three, four, five independent program loops operating independently of each other at the same time, which is not possible to do with Arduino [and Scratch] because it uses traditional code line, which means it only executes one line at a time.”
Workshop also has an interesting debug feature that runs in closed loop feedback versus the traditional open loop feedback with simulation-based debugging.
“As the Cubit Controller is running the program you created you can hit debug on your Workshop and actually see in real-time where the Cubit Controller is executing in your program,” Gouw says. “The visual blocks and the wires will start glowing green, so it looks like a glowing green light traveling through your program – it’s giving a cue or time frame of where it is exactly in the code that it’s about to execute.”
A tool for learning and customization
Workshop doesn’t have to be a replacement to learning how to code. The Qfusion Labs team is working on a way to expose the underlying Lua code behind the visual code blocks so users can see the resulting code, make adjustments, and create their own Lua code.
“We want people to be able to understand the visual blocks,” Gouw says. “They’ll be able to zoom in on the block, expand it, and actually see the underlying code behind the block. It’s not up right now on our beta, but we will probably have that available on the first release or on the second run.”
As they’ve been developing Cubit, the Qfusion Labs team has been working with teachers, robotics classes, engineering instructors, and students to test and help shape Cubit.
“There’s been a huge interest in the education space because of the top-down approach to learning,” Gouw says. “We’ve gotten a lot of interest from teachers and educators because STEM education is being implemented very early on in schools, and this is a much easier way for kids and students to start understanding the world of programming.”
But Cubit is not just for beginners. It’s designed to expand from a maker’s first experience with DIY platforms to those with advanced knowledge. With custom Smartwares, advanced makers can wire in their own sensors, customize code blocks in Workshop, and use a library to control hardware directly; they can use their skills, but they won’t have to focus on the simple stuff that’s tedious to do by traditional coding. Gouw says it can be a challenge to convey that the platform is for the full spectrum of makers, but he thinks as skilled engineers see what Cubit is capable of they’ll see the advantages.
Once you’ve got a project idea, it’s a very quick platform for creating the electronic and code portions of projects.
“With all our projects the electronics have always taken around five minutes to connect because they’re all plug and play, and it’ll take anywhere from 10 minutes to half an hour to create the programs on the Workshop visual programs. If I were to do that in traditional code it would take me hours,” Gouw says. “The most time-consuming part is still the mechanical components like cutting things out of wood, 3D printing things, and designing parts.”
The community
Cubit is still a work in progress, and Qfusion Labs has launched a Kickstarter campaign to get the community involved to shape the platform.
“Kickstarter is organically shaping Cubit with the community,” Gouw says. “We want to see which type of Smartwares are people most interested in, which types people don’t really care about, and we’ll probably get comments like ‘hey, why don’t you have this type of sensor in your Smartware?’”
The pledge levels on Kickstarter have different combinations of Smartwares for a variety of experience levels, from beginners, to pros, to educators, and for varying project complexity levels.
Through June 15, give Qfusion Labs feedback and get your hands on this unique kit.
What’s next
The Qfusion Labs team already has a lot more Smartwares in the works, including a Wi-Fi Smartware to integrate with routers, get access through smartphones, and to be able to tap into the Internet of Things (IoT) and home automation applications. Long term they’d like to bridge the electronic/software gap even further to include mechanical aspects of development for a full mechatronics design platform, so despite an engineer’s own limited proficiency he or she can develop in all three areas with ease.