Simple MP3 Audio Playback With Raspberry Pi Pico
December 12, 2022
Blog

The RP2040, with a processing speed of 133 MHz, is capable of decoding MP3 files, and the Pico RP2040 dev board includes 2 MB of Flash–enough to store a significant amount of compressed audio. At a list price of $4, the Pico therefore makes an incredible and cost-effective platform for embedded audio playback.

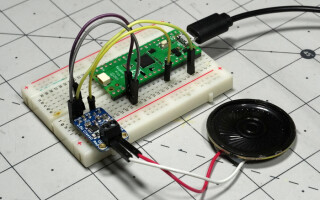
Pico and speaker with no amplifier (Image Credit: Jeremy Cook)
In fact, you don’t even need an amplifier in some situations. Just add a small speaker and a power source, and you’re good to go! We’ll be using CircuitPython for this experimentation.
The Easy Way: Raw Speaker Hookup
Modem noises straight from @Raspberry_Pi Pico GPIO pin via @CircuitPython 🔊 pic.twitter.com/88RH4LAaCe
— Jeremy Cook 🤖 (@JeremySCook) December 12, 2022
Pico and speaker with no amplifier (Video Credit: Jeremy Cook)
To get sound out of a Raspberry Pi Pico via a small speaker, the simplest way is to hook the positive lead of a small speaker up to an output pin, and the negative up to ground. Change the code found here for the GPIO and clip that you’re using, and your Pico will emit PWM audio, no additional hardware required!
Of course, you won’t get a huge amount of sound, as the output is limited by the maximum current output of the Pico/RP2040’s GPIO pins. My experimentation shows a maximum output here of roughly 18mA. It’s a bit of a hacky solution, but it could be appropriate for applications like a custom greeting card, modified toys, or similar ideas.

Linked Adafruit code modified to play clips in tweet above (Image Credit: Screencap)
Clips need to be formatted correctly for playback, and Audacity is an excellent, free tool for doing so. You’ll need to save your MP3s in the correct format–a bit rate of less than 64kbit/s and sample rate of between 8kHz and 24kHz. Drag your files onto the Pico’s Flash memory, and change the names in the code to match your clips.
More Power: Amplifier Usage

Need more power? Just ask Pam. PAM8302, that is. (Image Credit: Jeremy Cook)
If you want more capable audio than what’s available directly via the Pico’s GPIO pins, you can (should?) add in an audio amplifier to your setup. Adafruit sells a PAM8302 class D audio amplifier breakout pictured above, and you can find similar devices from the usual suspects. Hook the A+ up to your output GPIO, A- and GND up to ground pins, and Vin to either 3.3V or 5V.
The Amplifier has a little potentiometer on it that lets you vary the output power level. I’d recommend setting this low initially. I also experimented with changing input levels via a mixer by tinkering with the code found here, but didn’t find that to be particularly effective. It does, however, work well in its intended role of mixing two separate samples together at different input levels.
Going Further: Filtering, I2S
For better quality, a filtering setup may help take out some of the hissing you may hear with PWM audio. You can also circumvent Pico PWM altogether, and use an I2S amplifier, which we’ll explore in an upcoming post.
What’s outlined here will get you started with basic sound output, taking advantage of the Pico’s excellent processing and memory capabilities. For $4, plus an inexpensive speaker, it’s rather shocking just how well this simple setup works as an audio source.
Jeremy Cook is a freelance tech journalist and engineering consultant with over 10 years of factory automation experience. An avid maker and experimenter, you can follow him on Twitter, or see his electromechanical exploits on the Jeremy Cook YouTube Channel!


