Raspberry Pi Pico Turns Itself Off for Power Savings
January 24, 2023
Blog
While some microcontrollers use a tiny amount of power in shutdown mode–and even while running in some cases–e.g. the ATtiny series–others are more demanding. This can be especially true for dev boards with their additional overhead, and/or if you’re using sensors that never quite turn off power-wise.
.jpg)
Feed me! (Image Credit: Jeremy Cook)
For example, per my experimentation, the Raspberry Pi Pico uses:
- Pico: 18mA at 5V (blank CircuitPython program)
- Pico W: 27mA at 5V (blank CircuitPython program)
20 mA isn’t a lot of current when plugged in. However, if you’re using a small 200 mAh battery, it can theoretically only run for 10 hours on a charge when doing nothing else. If the vast majority of your system’s time is spent waiting for an input, one great solution is to allow it to power itself off using a flip-flop and transistor setup.
Flip-Flop LED Test
.jpg)
(Image Credit: Jeremy Cook)
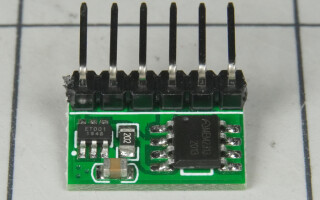
The board I’m using features a dual P-channel MOSFET, with a listed standby current of less than 10µA and a maximum current transmission of 6A. A transistor and capacitor are also onboard, along with a chip labeled “ET001 1948,” which apparently controls the device’s bistable operation.
The board has two switched output pins (Vo), two voltage input pins (Vi), a ground pin (G), and trigger (T) which is pulled to ground for activation. Testing was refreshingly simple: hook an LED/resistor up to Vo and G, and connect Vi and G to the input voltage and ground. To activate, temporarily pull the trigger to ground and the LED turns on, ground the trigger again and it turns off. In some circumstances this operation would even be useful without a microcontroller whatsoever.
Raspberry Pi Pico Latching Auto Power Off
.jpg) Caption: xxx
Caption: xxx
(Image Credit: Jeremy Cook)
To test this with the Raspberry Pi Pico, I breadboarded the circuit as shown above. When the button is pressed it pulls T to ground, turning the Vo output on. This boots up the Raspberry Pi Pico, which is programmed to immediately pull the control pin (GP0) high. The device turns on the onboard LED for 5 seconds, turns it off and stays running for another 5 seconds before grounding the trigger pin.
As shown, current results were 24 mA with LED on, 21 mA with LED off, and 0.00 mA after the entire system was toggled off. The latching board adds 3 mA to the Pico’s 18 mA current requirement, which is a bargain for embedded devices that would otherwise draw power in a standby state most of the time.
Flip-flop board allows @Raspberry_Pi Pico to turn itself off, using 0.00 mA current after cycle is done. pic.twitter.com/l1jatHfhuJ
— Jeremy Cook 🤖 (@JeremySCook) January 5, 2023
Per testing, the Pico’s GPIO pins appear to default to roughly +1V which is perfect for keeping the board untriggered. Powerup behavior may need to be considered for other applications. The other consideration is that in my initial coce, after the toggle value goes to 0, the LED initially flashed on, almost imperceptibly. It would appear the loop goes into led.value = 1 momentarily before the system fully powers down.
Current code adds a sleep delay at the end. You can simply omit the while True: to avoid looping behavior altogether, but the little LED flash provides a good lesson to keep in mind for later.
Other Switching Alternatives
Leading up to this article, my original idea was to turn a microcontroller on using a transistor, via an external input, then have it stay powered up via a microcontroller output. While this sounds simple enough, it didn’t work out as I’d planned. Such operation is possible, but the circuit outlined here uses a P-Channel MOSFET transistor, BJT NPN transistor, and a handful of diodes and resistors. Purchasing a flip-flop board seemed like a better use of my time, and integrating the same sort of functionality into a custom board could work nicely when needed.
A second alternative is to use a relay to entirely cut off power, which is simple to wire up. This also presents several disadvantages when compared to transistor-based options, including: greater power usage, larger size, slower switching speed, noise, and potentially a shorter life. Relays certainly have their place, but wouldn’t be my go-to solution for microcontroller power savings.
Power Considerations
Depending on your application, 20mA may not be a huge deal, and something that can be safely ignored. At other times, such as when using a limited battery supply or solar input, a constant 20mA drain is a deal-breaker. What’s presented here allows you to turn something on, then have it power down automatically when the task is done. Alternatively, you could use a sensor that works without constant power to start your process (e.g. a float switch), allowing your system to initialize and shut down without direct human interaction.
Jeremy Cook is a freelance tech journalist and engineering consultant with over 10 years of factory automation experience. An avid maker and experimenter, you can follow him on Twitter, or see his electromechanical exploits on the Jeremy Cook YouTube Channel!