Seeeduino XIAO: Powerful Controller in a Tiny Package
August 26, 2021
Blog
When it comes to tiny microcontroller development boards, there are a number of great options. I’m personally a big fan of the ATmega32U4-based Arduino Pro Micro which, among other functions, can emulate computer keyboard/mouse inputs as a human interface device (HID).

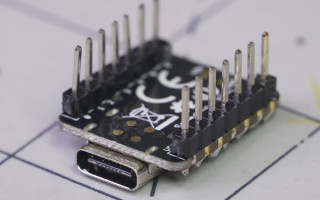
XIAO with headers soldered on (Image Credit: Jeremy Cook)
I used a Pro Micro in my recent JC Pro Macro rotary input, and in an earlier iteration I used the minuscule MellBell PICO board, which still still manages to mount an ATmega32U4 on its .6x.6in (~15x15mm) surface area.
For a device that’s smaller than a Pro Micro, with a much more powerful processor, the Seeduino XIAO presents an interesting alternative. The device is spec’d at 20x17.5mm, and with the overhanging USB-C connector, it’s about 22.5mm in total length–under an inch in both dimensions.
It features a SAMD21 ARM Cortex-M0+ microcontroller with 256KB of Flash and 32KB SRAM, each roughly an order of magnitude better than the Pro Micro, and a clock speed of up to 48MHz. The XIAO has 11 digital I/O pins broken out, all of which can be configured as interrupts (though not 5 & 7 simultaneously). It even features a 10-bit DAC on the A0 pin, not just a simulated analog signal via PWM. The device is HID capable, meaning it too can act as a keyboard/mouse/etc over USB-C.
Initial Programming and Setup
Of course the XIAO isn’t a standard Arduino board, so you’ll need to go through a few extra steps to get it working using the Arduino IDE. This is laid out in the getting started section of the XIAO documentation. I found it fairly straightforward, though this isn’t the first Arduino compatible board I’ve set up.

To summarize the setup procedure: under Arduino > Preferences… add the URL: https://files.seeedstudio.com/arduino/package_seeeduino_boards_index.json to the Additional Boards Manager URLs text input. If you already have a URL there, you can append it using the pop-out window (via the icon directly to the right of the text input). Once done, open the boards manager under the Tools > Board drop down, and search for “Seeeduino XIAO.” Install, and let it go through its process.
Select the new board, as well as the proper COM port under Tools, and you should be good to program. The “Blink” sketch is of course a great place to start, using one of its onboard LEDs.
Seeed also provides instructions for setting the board up to run Circuit Python, which I didn’t try myself, but could be a good option for fans of that programming method. There’s also a bit more setup info on this intro page, which among other things, reveals that there are actually three onboard LEDs that you can programmatically blink. I modified the code found there to blink each one individually, rather than at the same time, as seen in the short clip below:
Blinking 3 onboard LEDs on @seeedstudio tiny XIAO @MicrochipTech SAMD21 ARM Cortex board pic.twitter.com/KOcrUVD4c3
— Jeremy Cook ? (@JeremySCook) August 26, 2021
Other Considerations
Of course, this board isn’t suitable for all situations. While extremely capable, the raw number I/O pins is limited when compared to the Pro Micro and a variety of other boards. Also, the reset pin isn’t broken out in an easily solderable manner, which could be a bit of a nuisance in some situations. It seems that having to perform the reset operation is fairly common, which I had to perform during my experimentation.
Besides its small size, another benefit of the XIAO form factor is that it uses castellated pads, allowing it to be soldered to a larger board as a module. If you do like this form factor, but need something even more powerful, you might also consider the XIAO RP2040, based on the Raspberry Pi’s powerful RP2040 microcontroller. Unfortunately, it’s sold out on Seeed as of this writing.
The Bottom Line

Who’s a good boi? (Image Credit: Jeremy Cook)
For simple standalone tasks, or as an integrated computing module for more involved projects, the XIAO looks like a fantastic option. At around $8 each, they’re quite reasonably priced, and I’m personally excited to find a situation where this tiny-yet-mighty form factor fits perfectly into my project!
Jeremy Cook is a freelance tech journalist and engineering consultant with over 10 years of factory automation experience. An avid maker and experimenter, you can follow him on Twitter, or see his electromechanical exploits on the Jeremy Cook YouTube Channel!