Add a QR Code to Your KiCad PCB Design
April 25, 2022
Blog

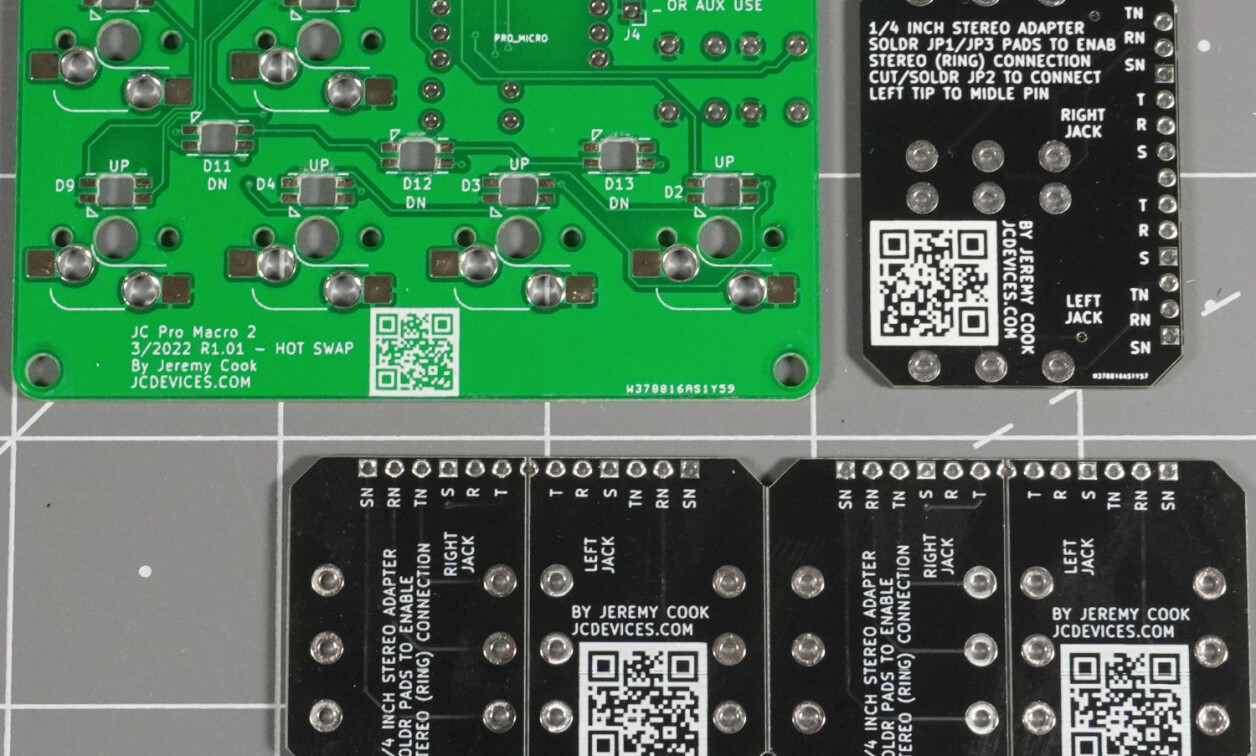
QR codes applied to a printed circuit boards are a great way to reference documentation, a store, or wherever other info is needed for a situation. Adding on to your PCB is quite simple using KiCad, as outlined in this article.
Step 1: Generate QR Code
There are a variety of ways to generate a QR code, but I’ve found that this Free QR Code Generator is quite easy to use, and does not require a login. Input your URL and click save. Click the download PNG icon once the code is generated, and save it to your desktop. There are various options you can modify, but you’ll likely want to stick with the defaults.
Step 2: Use KiCad Image Converter and Paste Onto PCB

Caption: PCB Design with QR code
Open the Image Converter application from the KiCad home screen, and select Load Bitmap, and the image file of your choice. Modify the on-PCB size as needed, select Footprint as the Output Format, and select the Board Layer (likely Front silk screen) where you want it applied. Select Export to Clipboard, and in the PCB Editor select Edit-Paste to add a new footprint into your design. Move it into place like a standard component.
Select the footprint and press e to edit it. You’ll most likely want to uncheck the option that shows the reference designator. Also, the side where the code is printed can be flipped as needed. As a final step, open up the 3D viewer and scan the code to make sure it looks OK and points to the correct URL.
QR Code Size Considerations
For the URL jcdevices.com, which redirects to my Tindie store, an image size of 8.5mm x 8.5mm proved to be large enough for both my fairly basic Motorola moto g7 smartphone to read, and for PCB manufacturer PCBWay to print legibly. This 8.5mm code was printed on a green PCB, and I printed 12mm QR codes on black PCBs in two other experiments. Other manufacturers were not tested, but capabilities could certainly vary.
The larger a URL, the more dots a QR code needs to express it, thus the larger it would need to be to be legible. For example, the first QR code below points to Elon Musk’s x.com, the second points to jcdevices.com, while the third points to the rather lengthy https://www.tindie.com/products/jeremycook/ez-fan2-tiny-raspberry-pi-fan-controller/, the product page for my EZ Fan2 board, used in this Raspberry Pi fan control article.

Caption: x.com

Caption: jcdevices.com

Caption: https://www.tindie.com/products/jeremycook/ez-fan2-tiny-raspberry-pi-fan-controller/
On my Android phone, websites without a “https://www.” prefix are handled correctly, so you may want to consider leaving it off to save space. Also, link shorteners, such as bitly, can be helpful, but come with their own set of pros and cons.
Convert Other Images for PCB Usage?
Along with QR codes, other images can be converted as well. This should be ideal for putting your logo on a silkscreen, icons to indicate functionality, or other purposes as you see fit. I experimented with pasting a rather modest 379 KB image onto a PCB, which looked good, but had some loading issues.

Caption: Scaled LEGO man and JC Pro Macro 2 keyboard
Image Credit: Jeremy Cook
After scaling the original image down to 50 KB, conversion was quite snappy, though much detail was lost. Size vs. quality is a tradeoff that will need to be considered here, but, whether for QR codes or more general images, KiCad’s conversion tool can significantly open up design possibilities.
Jeremy Cook is a freelance tech journalist and engineering consultant with over 10 years of factory automation experience. An avid maker and experimenter, you can follow him on Twitter, or see his electromechanical exploits on the Jeremy Cook YouTube Channel!


