Easily Create a Custom Macro Interface with the Raspberry Pi RP2040
October 05, 2022
Blog
In a previous article, I introduced the SparkFun Pro Micro RP2040, which inserts Raspberry Pi’s RP2040 microcontroller into the popular Pro Micro form factor. The obvious use is for custom keyboards/macro pads, and in this article we’ll explore how to turn an RP2040 into a very simple computer interface device using the also-Pro-Mirco-form-factor Adafruit KB2040. We’ll then take this a step further, and mount the KB2040 to a version of my JC Pro Macro 2 interface device, for a more refined HID experience.
CircuitPython, KB2040 Auto-Clicking
In the previous article we used MicroPython to program the RP2040, but here we’ll be using CircuitPython plus Adafruit’s HID library. Download the stable (7.3.3) CircuitPython KB2040 .UF2 file, which can be found via a search on this page, and install it by resetting with the boot button pushed, then dragging it into the RPI-RP2 drive that pops up. A “new” drive called CIRCUITPY will then appear that has CircuitPython installed on it. To add HID capabilities, download the adafruit-circuitpython-hid-7.x-mpy-5.3.3.zip file, then uncompress and drag the contents within the lib folder (adafruit_hid) into the RP2040 board’s lib folder.
Open up Thonny and switch to CircuitPython (generic) as the interpreter. You should be able to run/stop code as before, so go ahead and do a print(“hello”) or two to confirm things are working generally. To confirm you can use things as an HID device, run the bit of code shown below, which causes your mouse to auto-click every second. Save it on the CircuitPython device as code.py if you want it to run automatically on startup. Click the stop button in Thonny to return to normal operation (or just hover over the icon and let it auto-click itself off).

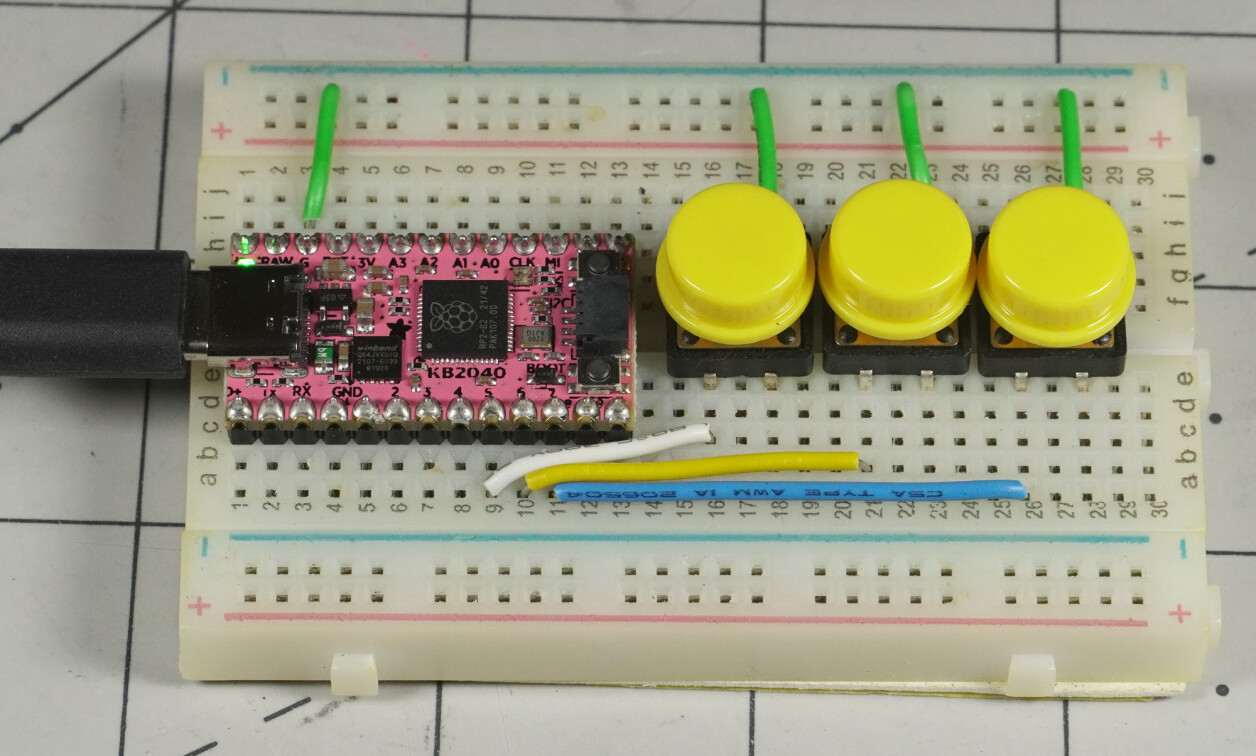
Breadboard Macro Pad
Auto-clicking is interesting, but it is of limited use at best. Having it perform one or more custom operations based on a user input; however, can be quite useful. The good news is that the auto-clicker implementation takes care of the requirements for such a setup, and all we need to do is wire up a few buttons and input the appropriate code.
Wire up buttons to pins 5, 6, and 7 as shown in the first image on this page. Inputs are somewhat arbitrary here, so don’t be afraid to experiment. Code for this breadboard macro pad is fairly simple, allowing you to easily scroll through browser tabs and hit enter. Note that you can define the buttons as pullup or pulldown. I chose pullup for compatibility reasons, though pulldown may make more sense to you.

This directory in the Adafruit_CircuitPython_HID GitHub page has lots more specifics on coding a virtual keyboard/mouse/consumer control device, and much of this bit is modified from Novaspirit Tech's excellent video found here. If you prefer to use the standard RPi Pico for this type of macro operation, and/or would like a bit more visual instruction, that is a great place to start. Also, remember that coding is case sensitive–Keyboard ≠ keyboard.
Keypad Add-On
Auto-clicking is fine, breadboard macro pads are even better, but what about subbing in a KB2040 for a formerly Pro Micro-based system? This is definitely possible, and after a few minutes of fiddling, I had one installed on a JC Pro Macro 2 user interface device, control-tabbing through my browser with ease. After a bit more work I’ve now got it functioning with the encoder, lights, and an OLED display.

Caption: JC Pro Macro 2 prototypes, one mounting a KB2040
The ease at which I’ve been able to code up a simple macro pad on the RP2040 is astonishing to me, though it was a bit of a process to assign each switch correctly. When subbing this out for the standard Pro Micro, one would also have to remember to either not attach the extra (alternative USB D+ and D-) pins, or to let them hang off the socket if you’re using one. Notably, the KB2040 also features a Qwiic/STEMMA QT connector on the back, which could allow for easy expansion.
I’m excited to see where my RP2040 journey takes me. It’s a fantastic chip, which is quite well supported given it was introduced less than 2 years ago. Perhaps most importantly, it’s widely available, which certainly counts for something as of this writing in 2022!
Jeremy Cook is a freelance tech journalist and engineering consultant with over 10 years of factory automation experience. An avid maker and experimenter, you can follow him on Twitter, or see his electromechanical exploits on the Jeremy Cook YouTube Channel!