How to Enable Secure Boot on Raspberry Pi 4
October 30, 2025
Blog
Enabling secure boot on Raspberry Pi 4 is often identified as a key development step to protect devices against cyber-attacks. In this third article of our secure boot series, Simon, a software engineer at The Embedded Kit, walks us through the process to configure secure boot on Raspberry Pi 4 boards: hardware setup, software dependencies, and verification steps.
Secure Boot Definition
As a reminder, secure boot is a verification mechanism that ensures that only trusted software runs on your hardware, Raspberry Pi or else. It uses a copy of a public key embedded in the SoC to authenticate the next bootloader signature via the ROM code.
Consult our previous article on the secure boot definition.
This level of protection is important in industrial environments where Raspberry Pi devices are commonly used as monitoring systems or network gateways.
How to implement secure boot on a Raspberry Pi 4?
As each board is unique, the secure boot process varies accordingly.
The Raspberry Pi documentation is here to help you enable this feature on your board.
Unlike other machines, secure boot is not enabled by default on the Raspberry Pi 4, and verification begins with the GPU. It relies on a Raspberry Pi proprietary EEPROM binary that authenticates the next stage.
Additionally, the DTB (Device Tree Blobs) are not included in the FIT image, but rather in the bootloader partition. Therefore, they must be authenticated before U-Boot.
Now let’s review every step of the implementation process together.
Overview of the secure boot process
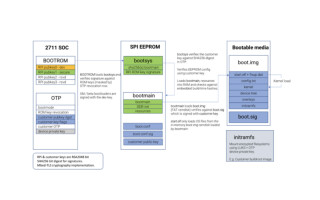
You can see an abstract of the secure boot process in this image provided by the Raspberry Pi support team:
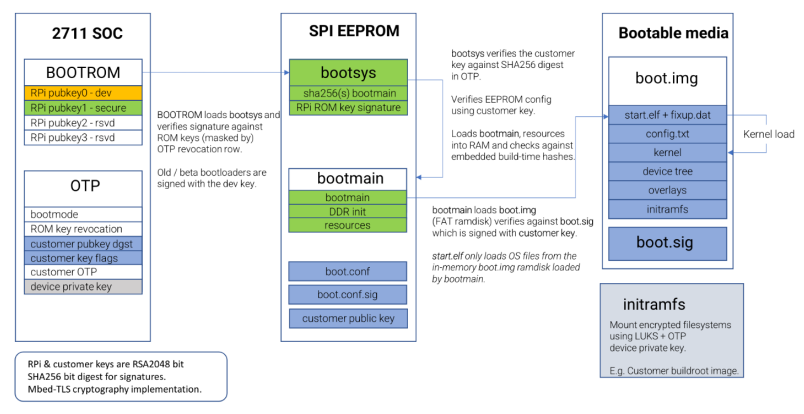
1. Build and sign a secure image
To build a secure boot-compatible Yocto image for the Raspberry Pi 4, you can get started with Welma Yocto Linux pre-configuration. Simply set ‘WELMA_SECURE_BOOT = "1"’ in your ‘local.conf’ file. This directive modifies the build process to generate the appropriate output.
Unlike the standard boot on Raspberry Pi (which relies on ‘start.elf’, configuration files, and a device tree blob, or DTB, with overlays), secure boot requires a different structure. First, the customer’s key must be embedded into the DTB. This key is then passed to the initramfs to continue the secure boot chain.
Next, all boot-related files must be packaged into a single image file named ‘boot.img’, conforming to the format expected by the secure bootloader. Raspberry Pi provides helper scripts for this purpose in their GitHub repository.
Once the image is assembled, it must be signed using the customer’s key to ensure authenticity during the boot process. The resulting boot.img and boot.sig are placed in the boot partition of the SD card, which must be formatted as vFAT.
At this stage, the image is ready to boot. However, to enable secure boot, the bootloader itself must be replaced with a version that supports signature verification.
2. Create and sign the BL2 bootloader
To build a secure bootloader for the Raspberry Pi 4, you'll once again rely on the Raspberry Pi GitHub. This repository contains the rpi-eeprom tools, which provide access to various firmware versions and the scripts required to configure them.
To configure the BL2 and enable secure boot, you need to modify the ‘boot.conf’ file by setting ‘SIGNED_BOOT=1’. Note that this configuration does not lock the device or fuse the OTP memory. This means the secure boot is not fully enforced yet: someone could still flash the bootloader and inject their own key!
Once the configuration is prepared, sign the ‘boot.conf’ file using your customer key. Then, apply the configuration using the ‘rpi-eeprom-config’ script. This process generates a custom bootloader binary (‘pieeprom.bin’) based on the original version.
To flash the new bootloader, place ‘pieeprom.bin’, its corresponding SHA-256 hash, and a special recovery file (called ‘recovery.bin’) onto an SD card. Inserting this card into the Raspberry Pi 4 triggers the bootloader update.
The last step is to assess the boot process, and once verified, fuse the OTP to permanently enable secure boot and lock the device against unauthorized modifications.
3. Fuse OTP and lock down the board
To fuse the OTP and permanently enable secure boot, you will need the ‘rpiboot’ utility from the Raspberry Pi ‘usbboot’ repository. By default, RPIBOOT is disabled on the Raspberry Pi 4B, so you must first configure a GPIO pin to trigger it.
Start by erasing the EEPROM using an SD card containing a ‘config.txt’ file with the directive ‘erase_eeprom=1’. This resets the EEPROM and allows you to program the RPIBOOT GPIO pin. Raspberry Pi recommends using GPIO 8, so update ‘config.txt’ with ‘program_rpiboot_gpio=8’, then run ‘rpiboot -d .’ to use the current directory as the boot partition.
Once configured, placing a jumper on the designated GPIO pin (as shown in the diagram below) will force the board to boot via RPIBOOT instead of the default EEPROM sequence.
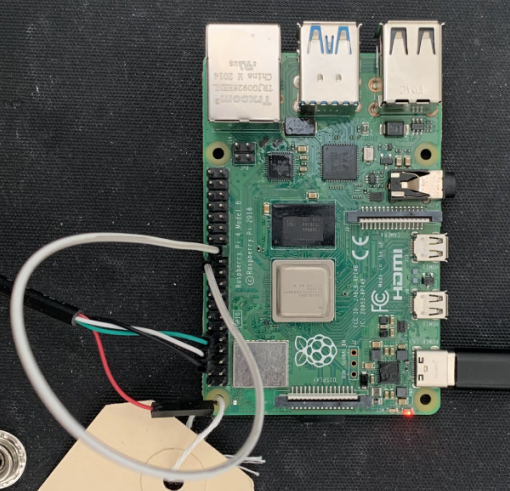
With RPIBOOT active, you can now write the hash of your public key into the OTP. To do this, add ‘program_pubkey=1’ to ‘config.txt’ and run ‘rpiboot -d .’ again. This step fuses the key hash into the OTP, completing the secure boot setup.
Secure boot is now fully enabled on your Raspberry Pi 4!
This article is part of a series brought to you by The Embedded Kit team. At The Embedded Kit, we develop software tools designed to accelerate embedded software development. To explore our full suite of tools, visit our website at theembeddedkit.io.
Simon P. is an embedded software developer, trained at INSA Lyon. At The Embedded Kit, he contributes to the development of our Welma Yocto Linux distribution, focusing on system security and low-level development. His work includes implementing secure boot and improving the distribution reliability for embedded applications.

Simon P. is an embedded software developer, trained at INSA Lyon. At The Embedded Kit, he contributes to the development of our Welma Yocto Linux distribution, focusing on system security and low-level development. His work includes implementing secure boot and improving the distribution reliability for embedded applications.